How To Use Vernier Caliper Step By Step, A Practical Guide

How to Clean and Maintain Your Safety Goggles
March 27, 2025
Top 8 Industrial Safety Equipment Mistakes and How to Avoid Them
April 22, 2025Have you ever tried to take a super precise measurement, only to end up confused, frustrated, or unsure whether you did it right? Whether it’s for a school project, a mechanical repair, or professional machining, getting the measurement exactly right can feel impossible without the right tools. That’s where the vernier caliper comes in.
This humble instrument might look intimidating with its double scale and sliding parts, but it’s actually a lifesaver when you need high accuracy and repeatability. The issue most people face is not having a clear, easy-to-follow guide that breaks things down in easy language.
That’s why we have created this practical guide—to help you master calipers without any stress. Once you understand the parts, the reading technique, and a few key terms, you will be surprised at how simple and powerful this tool really is.
Key Takeaways
- Calipers offer top-level precision for detailed work.
- Always zero the tool before measuring to avoid errors.
- Use both the main and vernier scales to get accurate results.
- Regular calibration keeps your readings consistent and reliable.
What Is a Vernier Caliper
It is a special measuring tool used to get very accurate measurements of different objects. It helps you measure how wide, deep, or long something is, more precisely than a regular ruler.
You can use it to measure:
- Outside size (like the thickness or diameter of a pipe)
- Inside size (like the width of a hole)
- Depth (like how deep a container or hole is)
What makes this tool special is that it has two scales:
- The main scale is like a normal ruler.
- The vernier scale slides over the main scale and helps you read smaller values more accurately.
By using both scales together, you can measure very tiny differences—down to parts of a millimeter. This is really important in jobs where even a small mistake in size can cause problems.
Why Use a Vernier Caliper Instead of a Regular Ruler
A regular ruler is fine for basic measurements, but when you need something to be really exact, it’s not always good enough.
Here’s why a caliper is better:
- A ruler usually measures only in whole millimeters. A caliper can measure very small differences—like 0.02 mm or even 0.001 inches.
- You can measure outside sizes, inside sizes, and depth—all with the same tool.
- Sometimes, with a ruler, you might get different results depending on how you look at it. Calipers give you a clear and exact result.
- In jobs like engineering, science, or mechanics, people need tools they can trust. That’s why calipers are used in many industries.
So, if you need accurate and trusted measurements, a caliper is the tool to use.
Step-By-Step: How to Use a Vernier Caliper
Using it might look confusing at first, but once you break it down, it’s actually pretty simple. Just follow these easy steps, and you will be measuring like a pro in no time.
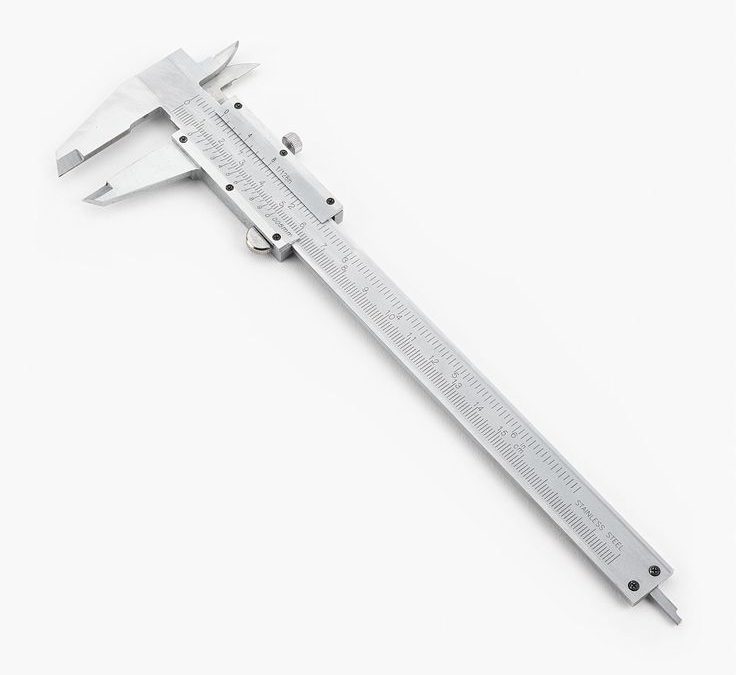
Step 1: Get to Know the Parts
Before you start using it, it’s important to know what each part of the tool does:
- Fixed outer jaws: These stay in place and help measure the outside of things, like the width of a rod or pipe.
- Movable outer jaws: These slide along the scale and move to fit around your object.
- Fixed inner jaws: These are used to measure the inside of a hole or tube.
- Movable inner jaws: These help reach both sides inside something and give an accurate reading.
- Depth rod: A thin rod that sticks out from the bottom, used to measure how deep a hole or container is.
- Lock screw: This small screw locks the sliding part in place so the measurement doesn’t move.
- Main scale: The bigger, fixed scale (like a regular ruler).
- Vernier scale: The smaller sliding scale that helps give you an exact measurement.
Knowing these parts helps you use the tool properly and avoid mistakes.
Step 2: Make Sure It’s Set to Zero
Before measuring anything, you should check that your caliper is starting at zero:
- Close the jaws all the way. The ‘0’ on both the main and vernier scales should match.
- Look closely for any gap or mismatch. If they don’t line up, there may be a small error.
- Clean the jaws with a soft cloth to remove dust or dirt that could affect accuracy.
- Adjust it if needed. Some calipers can be adjusted; if not, you just need to note the small error and subtract it later.
Always start with a zero reading so your measurements are correct.
Step 3: Measure the Object
Use the right part of the tool depending on what you’re measuring:
For Outside Measurement (like the width of a rod):
- Open the outer jaws.
- Place them around the object.
- Gently close the jaws until they just touch the object. Don’t squeeze too hard.
For Inside Measurement (like the width of a hole):
- Put the inner jaws into the hole or opening.
- Open them slowly until they touch both sides.
- Make sure the caliper is straight and not tilted.
For Depth Measurement (like the bottom of a container):
- Put the flat end of the caliper on the top of the hole.
- Push the depth rod down until it touches the bottom.
- Keep the tool straight and flat for a correct reading.
Always hold the tool steady when measuring so you get an accurate result.
Step 4: Lock It and Read the Measurement
Now that you have taken the measurement, it’s time to read it:
- Tighten the lock screw so the slider doesn’t move.
- Look at the main scale and note the number just before the ‘0’ of the vernier scale.
- Look at the vernier scale and find the line that matches exactly with any line on the main scale.
- Multiply that vernier line number by the least count (usually 0.02 mm).
- Add both numbers together to get the final measurement.
Example
- Main scale reads: 14 mm
- Vernier scale matches at line 5
- Least count = 0.02 mm
- Final reading = 14 + (5 × 0.02) = 14.10 mm
That’s your vernier caliper reading!
Step 5: Double-Check Your Measurement
Even if you think the first measurement is correct, it’s a good idea to check again:
- Measure a few times to make sure the reading is the same.
- Try from different angles or positions if possible.
- Avoid using the tip of the jaws, as they may wear out and affect vernier caliper accuracy.
Taking an extra moment to check saves you from making mistakes. It’s better to measure twice than to get something wrong and start over.
Common Mistakes to Avoid
Even though using a caliper is not too hard, some small mistakes can give you wrong results. These mistakes are very common, especially if you’re new to using the tool. But once you know them, they’re easy to avoid.
Here are some simple things to watch out for:
- Not Zeroing the Caliper
If the caliper doesn’t start at zero, every measurement you take will be wrong. Before you begin, close the jaws and check that both ‘0’ marks line up. If they don’t, clean it or adjust your reading.
- Reading from the Wrong Angle
If you look at the scale from the side, or if the light is too dim, you might read the wrong number. Always look straight at the scale and make sure you have good light.
- Not Locking the Scale
After you take a measurement, use the small screw to lock the sliding part. If you don’t, it might move a little and change your result.
- Using Too Much Pressure
Don’t press the jaws too tightly on the object. It can bend the tool or damage soft things like plastic or rubber. Just close the jaws gently until they touch the object.
- Skipping Accuracy Checks
Calipers can get slightly off if they’re dropped or used a lot. From time to time, check the tool by measuring something with a known size (like a coin or a block). This will help you know if the tool is still correct.
You can avoid all of these mistakes by taking your time, using the tool carefully, and practicing. The more you use it, the easier it gets—and your measurements will be spot on.
How to Check Vernier Caliper for Calibration
To make sure your caliper gives correct results, you should check its accuracy from time to time. This is called calibration, and it helps keep your measurements reliable.
Here’s how to do it in a few easy steps:
- Make sure the jaws are fully closed. The ‘0’ on both scales should line up. If they don’t, your caliper may have a small error.
- Measure an object that you already know the size of, like a gauge block or coin. The caliper’s reading should match the real size.
- Take the same measurement 2–3 times. If the numbers are different each time, the caliper may not be accurate.
- Wipe the tool clean and try again. Dirt or dust can affect the reading.
- If it’s still not showing the right result, it might need to be recalibrated—or you may need a new one.
Checking your caliper often helps you get the right measurements and avoid mistakes in your work.
Vernier Caliper Least Count Explained
The least count is the smallest measurement your caliper can display. It determines your precision level.
Common least counts:
- 0.02 mm (standard)
- 0.01 mm (advanced)
- 0.001 inch (imperial models)
Formula: Least count = 1 main scale division – 1 vernier scale division
This small number adds a lot of value—especially in industries where tiny margins matter.
Vernier Caliper Price in Sri Lanka
Wondering about the caliper price in Sri Lanka?
Here’s a quick breakdown:
- Basic manual caliper: LKR 2,000–4,000
- Mid-range digital model: LKR 5,000–10,000
- High-end precision calipers: LKR 12,000–18,000
Prices vary by brand (Mitutoyo, Insize, Groz, etc.) and features (waterproof, backlit, stainless steel). Always choose a reliable supplier and check warranty or return policies.
Real-World Uses of Vernier Caliper Scales
You will find calipers in dozens of industries:
- Car and bike repair: To measure things like brake disc thickness or engine parts so everything fits and works properly.
- Metalwork and machines: To make sure metal parts are the exact size they need to be, especially when they need to fit together tightly.
- Science labs: To measure small samples or tools very precisely during experiments.
- Jewelry making: To check the size of gemstones, ring holes or tiny parts where accuracy really matters.
- DIY and home projects: Great for measuring wood, pipes, or screws when you’re cutting or building something at home.
If your job or hobby involves measurement, a caliper can save you time and improve results.
Frequently Asked Questions (FAQs)
1. Can there be an error in the vernier caliper measurement?
Yes, errors can happen while using a caliper. This may be due to zero error, dirt on the jaws, or incorrect handling. Always check and clean the tool before use to get accurate results.
2. How to calculate the vernier caliper?
First, check the number on the main scale just before the ‘0’ on the sliding scale. Then, find which line on the sliding scale matches the main scale. Multiply that line number by 0.02 mm and add it to the main scale number.
3. How do you read the vernier caliper properly?
Always make sure the caliper is clean and set to zero before measuring. Don’t press the jaws too hard, as it can give a wrong reading or damage the tool. Handle it gently and store it safely to keep it accurate.
4. What is 0.02 mm vernier scale?
This means the caliper can measure as small as 0.02 millimeters. It’s the smallest unit the tool can read, called the least count. It helps you get very fine and detailed measurements.
5. How to read a caliper in cm?
First, read the main scale in centimeters. Then, convert the extra millimeters from the sliding scale into centimeters (0.02 mm = 0.002 cm). Add both parts to get your full reading in centimeters.
Ready To Get Hands-On With Safety
Need trusted measuring tools or safety gear for your workspace? Safety First has you covered. We offer quality measuring instruments, digital tools, lab gear and protective equipment—all tested for durability and accuracy.
Contact our team today for tailored product recommendations and competitive pricing.
